Air drying can use less purchased energy and avoid repeated tumble action. A machine dryer can finish a family load quickly, soften some textiles, and keep laundry moving when the weather or living space is uncooperative. Neither advantage makes one method best for every garment, home, or day.
The useful question is not simply, “Is air drying or machine drying better?” It is:
Which permitted method will get this load fully dry, on time, without creating a bigger problem for the clothing or the home?
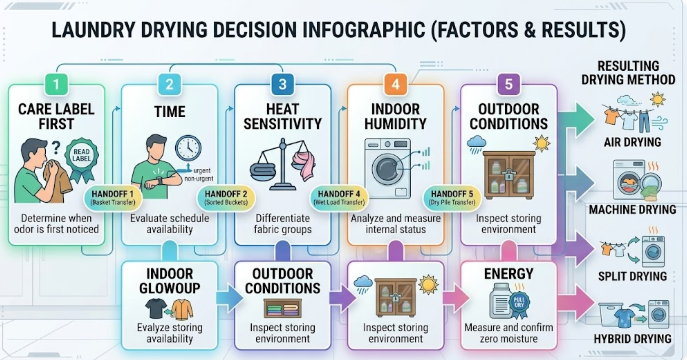
Start with the care label. Then consider the fabric, the amount of time available, the space and humidity where air drying would happen, and the settings your dryer actually provides. A household can use one method for towels, another for delicate clothing, and a combination for thick or time-sensitive items.
Practical rule: Choose the lowest-stress drying method that is allowed by the care label and can reliably finish before the item is needed.
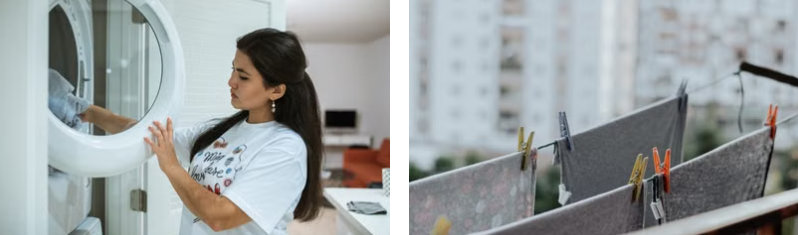
Let the Care Label Remove Unsafe Options First
Before comparing convenience or energy, read the drying instruction on the item. A label may permit tumble drying at a specified temperature, require line or flat drying, or prohibit tumble drying. In the United States, the FTC Care Labeling Rule requires covered garments to identify machine drying or another method and, when relevant, a safe drying temperature. Other countries use their own rules and symbol systems, but the practical principle travels well: the garment-specific instruction comes before a general laundry tip.
Pay special attention to:
- Do not tumble dry: choose an allowed alternative.
- Low-heat tumble dry: a hotter setting is not an equivalent shortcut.
- Dry flat: hanging may pull a wet, heavy knit out of shape.
- Line dry or drip dry: support the item as the label directs and protect floors from water.
- Professional care: do not convert that instruction into a home-drying experiment.
If the label is missing or unreadable, do not assume high heat is safe. Consider the fibre, construction, trims, elastic, coating, and replacement cost. A low-risk test may mean air drying on an appropriate support or consulting the manufacturer. Valuable, structured, embellished, waterproof, or unfamiliar items deserve more caution than an ordinary cotton T-shirt.
Compare the Methods by the Constraint That Matters Today
The same household may make a different choice in winter, during allergy season, or on the night before school.
| If your main constraint is… | Start with… | Check before committing |
|---|---|---|
| The item is needed soon | Machine drying, if permitted | Heat setting, load compatibility, sensor cycle, lint filter and vent condition |
| Heat or tumble action could harm the item | Air drying as labelled | Flat versus hanging support, colourfastness, shape and drying time |
| Purchased energy use is the priority | Air drying | Whether the space can handle added moisture and whether the load will finish fully |
| Indoor humidity is already high | Vented or condensing machine drying as designed, or safe outdoor drying | Appliance installation, outdoor conditions and the care label |
| Outdoor pollen is a problem | Indoor rack with moisture control or machine drying | Indoor airflow and humidity; avoid bringing pollen in on laundry |
| Rack space is limited | Machine drying or a hybrid method | Do not crowd the rack or create a persistent indoor moisture problem |
| Wrinkles or stiffness matter | Method and finish suited to the fabric | Remove promptly, shake and reshape; do not over-dry merely for softness |
| The load contains mixed drying needs | Split or hybrid drying | Keep each item within its label limits |
This table is a starting point, not a substitute for labels or observation. “Free” outdoor drying may cost time and expose laundry to weather. A dryer may save time but use energy and apply heat and mechanical action. Indoor racks avoid outdoor exposure but release the load’s water into the room.
When Air Drying Is the Better Fit
Air drying is often useful when the care label requires it, the item is sensitive to heat or tumbling, the household has enough time, or a suitable drying location is already available.
It can work especially well for:
- garments labelled line dry, hang dry, or dry flat;
- lightweight items that dry quickly with space around them;
- elasticated or decorated pieces whose labels limit heat;
- small loads that do not justify a machine cycle; and
- households able to use an outdoor line or a ventilated indoor area without obstructing movement.
Air drying is not automatically gentle if the item is supported badly. A saturated sweater can stretch on a hanger. A dark garment can fade when left in strong sun. Clothespins can mark a delicate edge. A crowded rack can create deep folds that stay wet long after the exposed surfaces feel dry.
Prepare the item before it reaches the rack:
- Use the washer’s label-safe spin setting to remove as much water as practical.
- Shake out folds and separate sleeves, legs, pockets, and layered areas.
- Reshape seams and hems while the item is damp.
- Use a hanger, line, or flat surface that matches the label and can support the wet weight.
- Leave space for air to move around each item.
- Turn or reposition thick items if one side remains damp.
- Check waistbands, cuffs, pockets, seams, and folded areas before storage.
Do not place a rack where it blocks an exit, creates a trip hazard, drips onto unsafe flooring, or sits against a heater contrary to the heater or garment instructions.
Indoor Air Drying Requires a Moisture Plan
Wet laundry does not make water disappear; it transfers that water into the indoor air. Whether that becomes a problem depends on the size and ventilation of the space, the starting humidity, the weather, and how much laundry is drying at once.
The US EPA advises keeping indoor relative humidity below 60 percent where possible, ideally between 30 and 50 percent, and responding to condensation as a sign that moisture needs attention. That guidance is about buildings, not a universal ban on indoor racks. It means the household should watch what the room is telling it.
Signs the current setup needs adjustment include:
- condensation on windows or cold surfaces;
- a room that stays damp or musty after the load should be dry;
- clothing that remains cool and clammy for an extended period;
- visible moisture damage; or
- a humidity reading that stays above the home’s safe target.
Use safe ventilation when outdoor conditions permit, or the home’s exhaust, heating, air-conditioning, or dehumidification systems as designed. A small humidity meter can help distinguish a room that merely feels cool from one carrying excessive moisture. If the home already has leaks, visible mould, persistent condensation, or a ventilation fault, adding racks of wet laundry is not the problem to solve first.
Outdoor Air Drying Has Its Own Trade-Offs
Outdoor drying can keep laundry moisture out of the home and may be practical in dry, breezy conditions. But availability, rules, security, smoke, dust, rain, freezing weather, shade, and local air quality can all change the decision.
Check the forecast and the actual drying location. Secure items so wind cannot carry them away. Place coloured or delicate fabrics as their labels and manufacturers allow rather than assuming strong sun is harmless. Bring laundry in only when the thickest sections are dry.
People affected by seasonal pollen may prefer another method on high-pollen days. The UK Met Office advises hay-fever sufferers to avoid drying washing outdoors when pollen counts are high or grass is being cut because pollen can be carried indoors on the laundry.
If outdoor drying is not permitted by a lease, building rule, or local requirement, use an allowed option. The environmental benefit of an air-dried shirt does not justify an unsafe balcony line or a dispute over a prohibited installation.
When Machine Drying Is the Better Fit
Machine drying can be the more reliable choice when the label allows it and the household needs predictable completion, has limited rack space, faces humid or freezing weather, or needs to keep moisture out of the living area.
Use the machine as a controlled tool, not a single “hot until done” setting.
- Read both labels. The textile label sets the garment limit; the dryer manual explains the machine’s cycles and capacity.
- Group compatible items. Heavy towels and lightweight shirts may finish at different times. A mixed load can leave some items over-dried while thick pieces remain damp.
- Do not pack the drum tightly. Items need room to tumble and expose wet surfaces to moving air.
- Select the permitted heat and cycle. More heat is not automatically better.
- Use sensor drying when appropriate. ENERGY STAR explains that moisture-sensing automatic termination can reduce energy use and unnecessary wear from over-drying.
- Remove items promptly. Shake, smooth, hang, fold, or finish air drying as needed.
- Confirm actual dryness. Check seams, waistbands, pockets, hoods, and thick layers before storage.
A sensor is helpful, not infallible. Very small loads, mixed weights, contact between fabric and the sensor, or a dirty sensor can affect results depending on the model. Follow the manual if loads routinely stop damp or continue too long.
Dryer Efficiency Also Depends on the Washer and Airflow
The dryer has less work to do when the washer removes more water during the final spin, provided that spin speed is safe for the load. Natural Resources Canada has identified faster water extraction as a way to shorten dryer time and reduce drying energy.
Before buying a new appliance, improve the process you already have:
- use an appropriate final spin;
- avoid combining items with very different drying times;
- clean the lint filter as the manual directs;
- keep the dryer’s airflow and vent system maintained;
- use automatic termination rather than repeatedly adding large timed blocks; and
- stop when the load is dry enough for its next step.
Dryer maintenance is also a safety matter. The US Fire Administration identifies failure to clean as a leading factor in home clothes-dryer fires and advises cleaning the lint filter every time the dryer is used. A cycle that takes progressively longer, a crushed or damaged vent, unusual heat, burning odour, error code, or failed exhaust airflow is a reason to stop and inspect the manual or seek qualified service—not to keep extending the timer.
Never machine-dry an item contaminated with flammable substances merely because it has been washed. Follow the product, appliance, and safety instructions and use professional guidance where required.
A Hybrid Method Often Solves the Real Problem
The choice does not have to be all air or all machine.
A hybrid approach can mean:
- a short, label-safe machine cycle followed by air drying;
- air drying first, then a brief permitted tumble to finish or soften;
- machine-drying thick household textiles while hanging lightweight clothing;
- removing delicate or fast-drying items early and letting the remainder continue; or
- drying one urgent outfit by machine while the rest of the load uses the rack.
The order matters. If the article is stained, do not apply dryer heat until the stain has been checked and treated appropriately; the next article in this cluster covers that decision. If the care label prohibits tumble drying, a “brief” tumble is still not permitted.
Hybrid drying is most useful when it removes a specific bottleneck. It can reduce rack occupancy, shorten machine time, limit heat exposure, or make a deadline achievable. It is less useful when it creates an extra handoff that the household consistently forgets.
Build a Drying Plan for the Load in Front of You
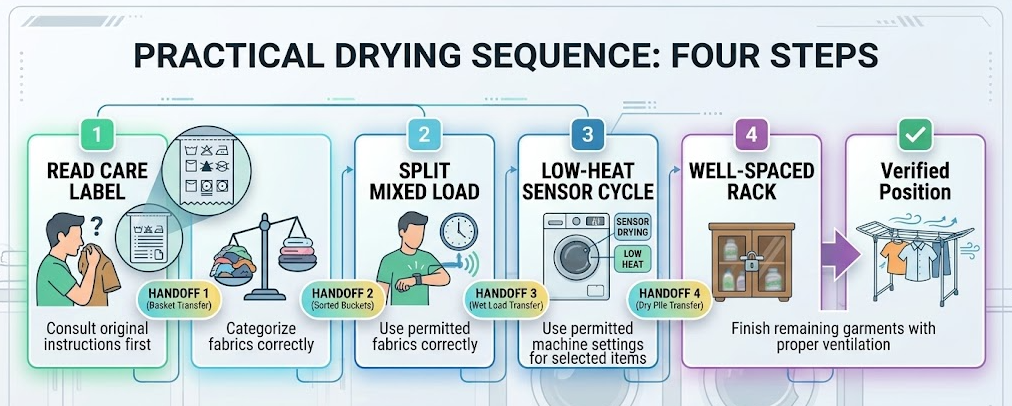
Use this quick sequence after washing:
- Remove prohibited options. Follow each item’s drying label.
- Identify the deadline. When must the item be wearable or ready for storage?
- Check the air-drying environment. Is there enough rack or line space, airflow, time, and moisture capacity?
- Check the machine option. Is tumble drying allowed, and can compatible items share a safe cycle?
- Separate the exceptions. Pull out flat-dry items, low-heat items, heavy pieces, and urgent clothing.
- Choose air, machine, split, or hybrid. Select the least demanding plan that will finish reliably.
- Set the handoff. Use an alarm if anything must be moved, turned, or removed early.
- Verify dryness. Do not fold or seal away damp areas.
If laundry repeatedly fails at drying, diagnose the limiting resource. A household may need more rack surface, better placement, a smaller batch, a faster washer spin, a different start time, or a clearer person responsible for the final handoff. Buying equipment should follow that diagnosis, not replace it.
What Not to Assume
- “Air drying is always better for clothes.” Poor support, strong sun, crowding, or prolonged dampness can create different problems.
- “A dryer always ruins clothes.” Label-safe settings, compatible loads, sensor termination, and prompt removal reduce unnecessary stress.
- “High heat saves time without a trade-off.” It may exceed the care label and can over-dry parts of a mixed load.
- “Indoor drying is harmless because there is no exhaust.” The load’s moisture enters the room and must be managed.
- “Outdoor drying is clean in every condition.” Pollen, smoke, dust, weather, and local restrictions matter.
- “The cycle ended, so the load is dry.” Thick sections still need a hand check.
- “One method must serve the entire load.” Splitting or combining methods is often the more practical choice.
Decision Summary
- Treat the care label as the first filter.
- Choose by the constraint that matters now: heat, time, space, humidity, energy, weather, or finish.
- Air dry with correct support, spacing, airflow, and a realistic completion window.
- Monitor indoor humidity and condensation rather than assuming every room can absorb a wet load.
- Consider pollen, smoke, weather, security, and rules before outdoor drying.
- Machine dry only at a permitted setting, with compatible items and enough room to tumble.
- Use sensor drying and stop unnecessary over-drying when the appliance supports it.
- Maintain the lint filter and airflow according to the manual.
- Use a hybrid method when it solves a specific time, space, or fabric-care conflict.
- Check thick areas before folding or storing.
The better drying method is the one that respects the garment, fits the home, and actually reaches completion. For many households, that will not be one permanent answer. It will be a small set of reliable choices: air for some items, a controlled dryer cycle for others, and a hybrid plan when the load contains competing needs.
FAQ
Is air drying always better for clothes than using a dryer?
No. Air drying avoids tumble heat but can stretch poorly supported items, expose fabrics to sun or pollen, and add moisture indoors. Follow the care label and choose the method that can finish safely in your actual space and timeframe.
Does machine drying shrink clothes?
Heat and tumble conditions can contribute to unwanted changes in susceptible garments, but risk varies by fibre, construction, previous treatment, and label instructions. Use the permitted temperature and cycle, and do not assume a hotter or longer cycle is safe.
Is it safe to dry clothes indoors?
It can be practical if there is enough space, airflow, and moisture control. Watch for persistent high humidity, condensation, musty odour, or slow drying. Address an existing leak, mould, or ventilation problem before adding more indoor moisture.
Should I use timed dry or sensor dry?
When appropriate for the load and supported by the machine, sensor drying can stop when moisture falls to the selected level and help avoid unnecessary drying. The appliance manual controls, and actual dryness should still be checked.
Can I partly machine-dry clothes and finish them on a rack?
Yes, if the care label permits machine drying. A hybrid method can reduce machine time or rack occupancy. Set a reminder for the handoff and make sure the item finishes fully before storage.
Why do some clothes remain damp when the dryer stops?
Mixed fabric weights, a very small or crowded load, folded or tangled items, cycle selection, sensor condition, or an airflow problem may contribute. Follow the manual, separate items with different drying times, and investigate repeated slow or incomplete cycles.
Sources
- FTC – Care Labeling of Textile Wearing Apparel and Certain Piece Goods
- EPA – A Brief Guide to Mold, Moisture and Your Home
- UK Met Office – Surviving Hay Fever: A Guide for Sufferers
- ENERGY STAR – Clothes Dryers
- Natural Resources Canada – Energy Consumption of Major Household Appliances Shipped in Canada
- US Fire Administration – Appliance and Electrical Fire Safety
More in This Cluster: Laundry Systems
- How to Build a Laundry Routine That Actually Gets Finished
- Sorting Laundry: What Still Matters and What Can Be Combined
- How Much Laundry Detergent Should You Actually Use?
- How to Prevent Musty Towel Odours From Coming Back
- Air Drying vs Machine Drying: Which Is Better for Your Clothes? (you are here)
- How to Treat Common Laundry Stains Before They Set
- Laundry Mistakes That Damage Clothes and Washers Too