A bathroom can take longer to clean when every surface is treated as a separate job. Dust falls onto a freshly wiped counter, shower residue reaches the floor, and a cloth used near the toilet returns to a cleaner fixture.
A useful order prevents that backtracking. It moves generally from high to low, from cleaner zones to dirtier ones, and from dry work to wet work—while leaving room for product labels, surface differences, and problems that should not be handled as routine cleaning.
Quick Answer
Start by ventilating the room, removing movable items, and checking for leaks, damaged finishes, visible mould, or body-fluid contamination. Remove dry dust and hair from higher surfaces before using wet products. Then clean mirrors and upper touchpoints, the shower or tub, the vanity and sink, and the toilet with separate tools. Finish with baseboards and the floor, working toward the exit.
Use product waiting time only when the label calls for it. Do not spray several incompatible cleaners around the room at once, and never mix household chemical products. Clean before disinfecting unless a labelled one-step product says otherwise. If water, residue, or dust will fall onto another surface, clean the receiving surface later.
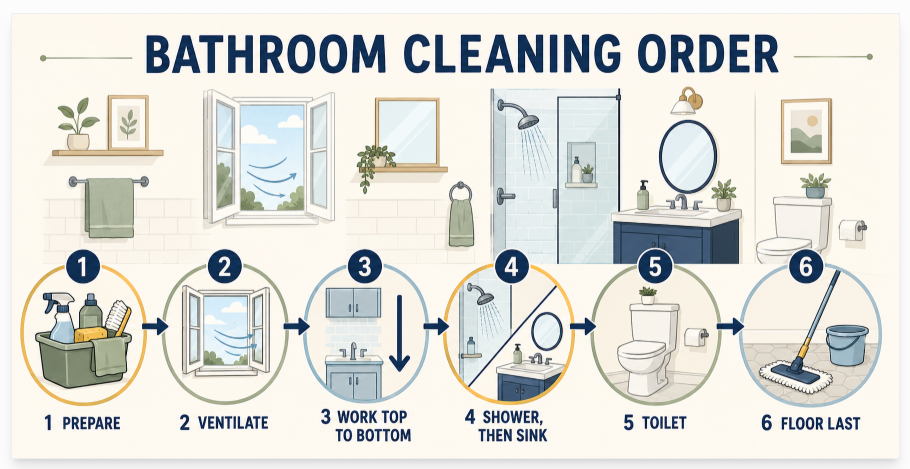
Use Three Rules Instead of Memorizing One Checklist
No single sequence fits every bathroom. A powder room has no shower. A family bathroom may contain bath toys, a changing area, an electronic bidet seat, natural stone, or several different metal finishes. A guest bathroom that is lightly used needs a different emphasis from a bathroom affected by illness.
Three rules make the order adaptable.
Work from high to low
Dust and loosened debris tend to fall. Clean the exhaust-fan grille, light fixture exterior, upper ledges, shelves, and mirror before the counter and floor beneath them. This does not mean washing a ceiling every week. It means inspecting higher areas first and handling only the work that is actually needed.
Move from cleaner to dirtier zones
Start with relatively clean surfaces and reserve the toilet bowl, toilet base, and floor around it for later. Use a separate toilet brush for the bowl and a separate cloth or fresh cloth face for the toilet exterior. Once a cloth has entered a dirtier zone, do not take it back to the faucet, door handle, or counter.
Do dry work before wet work
Hair and dust are easier to collect when dry. Vacuum or wipe them from safe, dry surfaces before spraying cleaner. Wetting loose hair first can turn it into residue that smears across the floor, baseboards, or vanity.
These rules are more useful than insisting that every sink must come before every tub. The practical question is: What might fall, drip, or transfer onto what I clean next?
Step 1: Inspect Before You Start
Take a short look around the room before opening a product.
- Is there water at the toilet base, under the sink, beside the tub, or below a supply line?
- Are grout, caulk, seals, paint, laminate edges, or wallboard cracked, loose, swollen, or soft?
- Is visible mould recurring in the same place?
- Is there blood, vomit, feces, sewage, or another contamination event?
- Are there medicine containers, razors, electrical devices, or small items that children or pets could reach?
- Which surfaces require manufacturer-specific care?
A leak, damaged material, large or recurring mould problem, or significant contamination may require a separate response before normal cleaning continues. Routine cleaner should not be used to conceal evidence of water damage, and chemical products should not be applied near energized electrical equipment.
Read the labels of the products you plan to use. Confirm the approved surfaces, required ventilation, protective equipment, application method, waiting or contact time, rinsing directions, and storage instructions. Health Canada advises following label directions, wearing the protection the label specifies, and never mixing household chemical products.[1]
Choose the fewest products needed for the actual surfaces. A bowl cleaner, glass cleaner, descaler, disinfectant, and general bathroom cleaner may contain ingredients that should not meet. More bottles do not make the sequence safer or more effective.
Step 2: Ventilate and Clear the Work Area
Run an exhaust fan that vents outdoors, or open a door or window when outdoor conditions and building safety make that appropriate. Ventilation does not make unsafe mixing acceptable, but it can reduce exposure when a product label calls for airflow.
Remove towels, bath mats, waste, laundry, toiletries, toys, portable organizers, toilet-paper packages, and items from the vanity top. Do not place potentially contaminated bathroom items on a bed, kitchen counter, or clean towel. Give washable items an appropriate destination and keep chemicals out of the reach of children and pets.
Emptying the room serves two purposes. It exposes hidden residue and moisture, and it prevents you from cleaning around bottle bases only to discover rings underneath them later.
Keep built-in or delicate components in place unless their instructions permit removal. Electronic bidet seats, lighted mirrors, fan covers, shower-door parts, and plumbing access panels may require power isolation or manufacturer-specific handling.
Step 3: Remove Dry Dust, Hair, and Loose Debris
Begin at the highest area that genuinely needs attention. With a suitable dry or slightly damp tool, work through accessible fan-grille surfaces, light-fixture exteriors, upper trim, shelf tops, door frames, vents, and ledges. Do not disturb suspect mould or unknown building material as if it were ordinary dust.
Move down to window sills, towel bars, cabinet fronts, baseboards, and exposed corners. Collect hair from the tub, shower, counter edges, and floor while it is still dry. Use a vacuum only where the surface is dry and the appliance is approved for that use; keep corded equipment away from water.
You do not need to sweep the floor perfectly at this stage. The goal is to remove enough loose material that wet cleaning does not spread it. A final floor pass comes last because later tasks can still send droplets, dust, and debris downward.
Step 4: Plan Product Time Without Creating a Mixing Risk
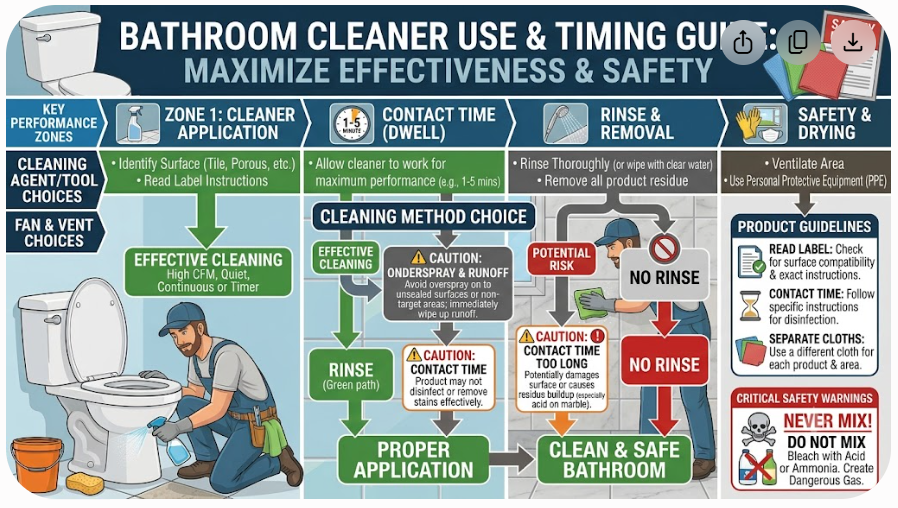
Some cleaners need time to loosen mineral deposits or soap residue. Disinfectants require the surface to remain wet for the contact time on the label. Waiting can be productive, but only when the room is managed deliberately.
Use this safer pattern:
- Select one zone and one compatible product.
- Apply only as the label directs; avoid unnecessary aerosolization.
- Set a timer if the label gives a waiting or contact time.
- Keep the zone undisturbed and adequately wet only as required.
- Rinse, wipe, or dry as directed before another chemical product reaches that surface.
- Change or rinse tools before moving to a different product or contamination zone.
Do not coat the shower, sink, toilet, and floor with different products at the same time merely to save minutes. Overspray, dripping cloths, rinse water, and reused sponges can bring those chemicals together. Health Canada specifically warns never to mix bleach with other cleaning products because toxic gas can result.[1]
If disinfection is justified, clean first unless the product label approves a one-step cleaning-and-disinfection use. The CDC explains that dirt and other impurities can make it harder for disinfecting chemicals to reach and kill germs.[2] Routine household cleaning is generally sufficient when no one is sick or at higher risk; disinfection is not automatically the final step for every bathroom surface.[2]
Step 5: Clean Mirrors and Higher Touchpoints
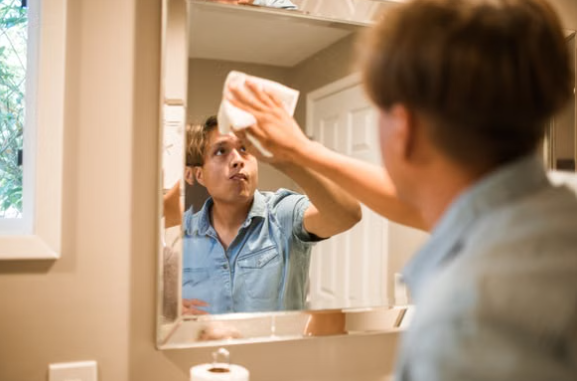
Clean the mirror before the sink and counter so drips or fallen lint can be removed later. Use a product and cloth compatible with the mirror, frame, backing, and any anti-fog or electronic features. Avoid flooding mirror edges, light fittings, outlets, switches, or seams.
Then clean relatively high, frequently touched surfaces such as the door handle, light switch plate, cabinet pulls, towel-bar touchpoints, and accessible shelving. Apply product to the cloth rather than spraying toward electrical components when the label and manufacturer allow that approach.
“Cleaner to dirtier” is not a claim that these surfaces are sterile. It is a tool-management rule. Use a clean cloth face and change it when it becomes visibly soiled or after it enters a higher-contamination area.
Step 6: Clean the Shower or Tub
The bathing area usually comes before the vanity, toilet, and floor because rinsing can send water and loosened residue outward. Work from upper compatible surfaces down toward the tub or shower floor and drain.
Keep the task within the material’s care instructions. Glazed tile, acrylic, fiberglass, natural stone, grout, caulk, coated metal, and glass do not necessarily tolerate the same cleaner or abrasive tool. Treat established soap scum, stained grout, recurring mould, and glass-door deposits according to their own material and safety decisions rather than escalating the entire room to a stronger product.
Rinse only as the label and fixture allow. A bathroom floor without a suitable drain should not be washed down as though it were a wet room. Dry overspray on nearby flooring, trim, cabinets, and painted walls before it penetrates a joint or damages a finish.
If the shower door is being cleaned during this session, include a basic compatible wipe as part of the enclosure pass. Detailed removal of hard-water deposits, care for coated glass, and maintenance of tracks, seals, and hardware require a surface-specific process rather than a generic room-order rule.
Step 7: Clean the Vanity, Faucet, and Sink
Clean loose dust or residue from the counter, then work around the faucet, handles, backsplash, soap area, sink bowl, drain surround, and vanity exterior. The exact sequence within the sink zone should prevent a dirty cloth from returning to a high-touch handle.
Pay attention to material boundaries. Stone counters, plated faucets, painted cabinetry, wood, laminate seams, and porcelain or composite sinks may have different care requirements. Do not allow a descaler or acidic cleaner used on one compatible surface to run onto another surface that the label excludes.
Rinse and dry where directed. Drying is not only cosmetic: it reveals whether residue remains and prevents water from sitting at seams, around fixtures, or on vulnerable cabinet edges.
Step 8: Clean the Toilet as a Separate Zone
Clean the toilet after the mirror, bathing area, and sink so toilet tools and cloths do not travel back across the room. Keep the bowl brush inside the bowl-only workflow. Use a different cloth or disposable material for the flush control, tank exterior, lid, seat, hinges, bowl exterior, and base, progressing from cleaner high-touch surfaces toward lower and dirtier surfaces.
Do not assume toilet-bowl cleaner belongs on the seat, hinges, bidet components, exterior porcelain, or floor. Acidic bowl cleaner, bleach, and other chemicals may damage nearby materials or react with residue from a different product. Follow both the product label and fixture instructions.
If the toilet is leaking, moves at the floor, has a cracked component, or shows recurring moisture at the base, stop treating the symptom as a cleaning problem. Preserve the evidence and arrange the appropriate repair assessment.
Step 9: Finish With Baseboards and the Floor
After all higher and wetter tasks are complete, make the final debris pass. Clean lower trim and baseboards if needed, then vacuum, sweep, or damp-clean the floor using a method approved for the flooring.
Start at the farthest practical point and work toward the exit so you do not walk across the cleaned surface. Pay attention to the toilet base, vanity toe-kick, behind the door, corners, and transitions where water can collect. Do not flood seams, wall edges, heat vents, or flooring that is not designed for standing water.
The floor comes last because it receives the consequences of nearly every previous step. Cleaning it earlier usually creates a second floor-cleaning job.
Reset the Room Only After Surfaces Are Ready
Allow surfaces to dry or complete any label-required rinse before replacing items. Return only clean, dry bottles, organizers, mats, towels, and tools. Placing a wet container on a dry ledge or returning a damp bath mat can recreate the condition you just removed.
Empty or clean the waste container as needed. Handle reusable cloths and mop heads without carrying them through clean living or food-preparation areas, and launder them according to their labels. Let brushes and tools drain and dry in a way that does not contaminate other surfaces. Wash your hands with soap and water after cleaning.[1]
Use the reset as a short inspection:
- Did one product leave residue or damage?
- Does a surface remain wet longer than expected?
- Is a seal, joint, fan, drain, or fixture failing?
- Did one tool cross from the toilet or floor back to a cleaner zone?
- Are frequently used products safely stored in their original containers?
If the same problem returns after each cleaning, change the diagnosis rather than only increasing effort.
Adapt the Order to the Kind of Cleaning
The full sequence is most useful for a periodic whole-bathroom clean. A quick reset can be shorter: remove items, collect hair, clean the needed touchpoints and fixtures, then finish the floor only if it is dirty.
For an illness-related clean, prioritize the surfaces and contamination specified by current public-health guidance. Clean before targeted disinfection, observe the product’s full contact time, and separate contaminated tools. A body-fluid event is not merely a reason to move the toilet earlier in the normal checklist; it can require its own controlled procedure.
For a guest bathroom, visible cleanliness and fresh, dry textiles may matter most, but fragrance should not replace cleaning or ventilation. For a bathroom affected by renovation dust, water damage, sewage, or a large mould problem, ordinary room cleaning may be the wrong starting point entirely.
The best bathroom cleaning order is therefore not a rigid list. It is a controlled flow that keeps falling debris, rinse water, dirtier tools, and chemical products from undoing completed work. Prepare first, work high to low and cleaner to dirtier, keep incompatible tasks separate, and leave the floor until the room above it is finished.
FAQ
What is the best order for cleaning a bathroom?
Prepare and ventilate first, remove movable items, collect dry dust and hair, then clean mirrors and higher touchpoints. Continue with the shower or tub, vanity and sink, and toilet using separate tools. Finish with baseboards and the floor, working toward the exit. Change the order when product labels, surface materials, contamination, mould, or a repair problem require a separate response.
Should I clean the toilet or shower first?
In a whole-room routine, clean the shower before the toilet because shower rinsing can spread water and residue, while toilet tools should not return to cleaner fixtures. Keep the toilet as a separate late-stage zone. A leak, body-fluid event, or other urgent contamination may need to be contained before the normal room sequence begins.
Should the bathroom floor be cleaned first or last?
Usually last. Dust, hair, rinse water, and product droplets can fall during other tasks. Remove obvious dry debris early if it interferes with safe work, but complete the final vacuuming, sweeping, or damp cleaning after the higher surfaces and fixtures are finished.
Can I spray cleaner everywhere and let it sit while I clean something else?
Only if every product label, surface, ventilation requirement, and separation boundary makes that safe. In practice, one zone at a time is easier to control. Several products applied around a small bathroom can meet through overspray, runoff, rinse water, or reused cloths. Never mix household chemical products.
Do I need to disinfect the whole bathroom after cleaning?
Usually not. The CDC says regular household cleaning is generally sufficient when no one is sick or at higher risk. Targeted disinfection may be appropriate for illness, specified contamination, or public-health direction. Clean first unless a labelled one-step product states otherwise, and keep the surface wet for the contact time on the disinfectant label.
Why should I dust before using wet cleaner?
Dry hair and dust are easier to collect. If they are wetted first, they can smear across counters, tubs, baseboards, and floors. Removing loose debris first also gives a wet cleaner more direct contact with the surface.
How can I clean a bathroom faster without skipping important work?
Clear the room once, carry only compatible products and separate tools, work high to low, complete one zone before moving to the next, and use label-required waiting time deliberately. Avoid backtracking by leaving the toilet and floor until later and resetting clean, dry items only after surfaces are ready.
Sources
- Health Canada – Use Household Chemicals Safely
- CDC – When and How to Clean and Disinfect Your Home
- CDC – Cleaning and Disinfecting
- University of Arkansas Cooperative Extension – Torrie’s Top Tips for Deep Cleaning Your House
- Cleaning Services Group / University of La Verne – Guide to the 8 Rules of Cleaning