A toilet can look clean while still holding residue under the rim, around the seat hinges, or at the base. It can also be damaged when glazed ceramic, plastic, metal, rubber, and electronic bidet parts are treated as one surface.
A reliable routine separates the bowl from the exterior, works from cleaner areas toward dirtier ones, and uses disinfection only when there is a reason for it. The goal is to remove soil safely, prevent cross-contamination, and notice leaks or material damage early.
Quick Answer
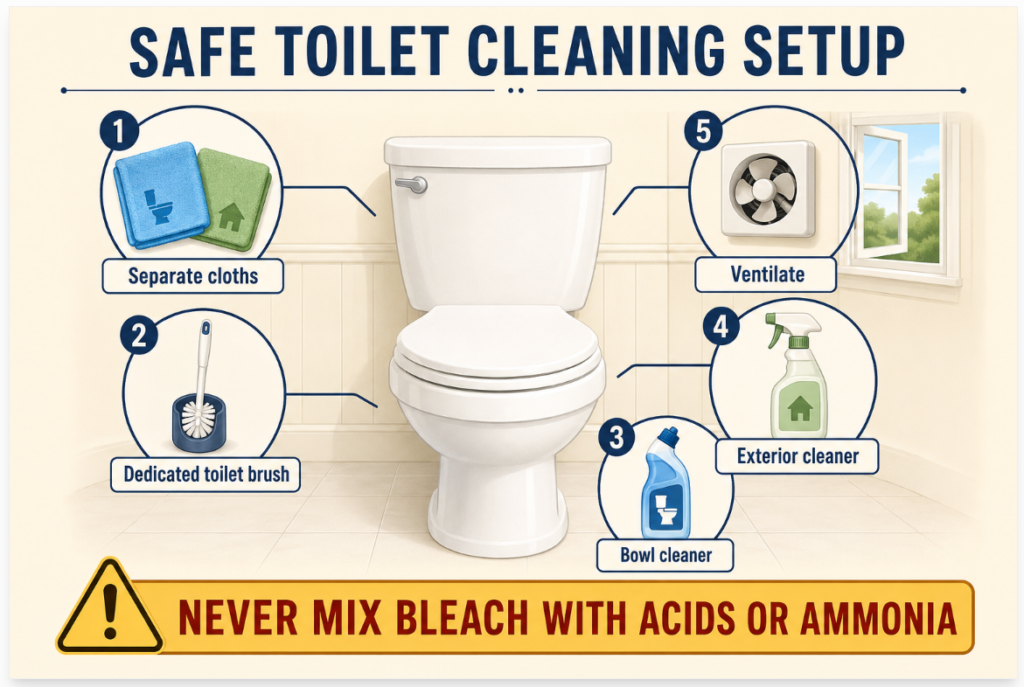
Ventilate the bathroom and read every product label before starting. Remove items around the toilet, put on any protective equipment the label requires, and use toilet-only cloths or disposable towels. Clean the flush control, tank, lid, seat, hinges, rim, outside of the bowl, base, and nearby floor with products compatible with each material. Clean the bowl with a labelled bowl cleaner and a toilet brush, keeping that product inside the bowl.
Routine cleaning is usually enough in a healthy household. Add a compatible disinfectant when someone is ill, after vomit or fecal contamination, or when public-health guidance calls for it. Clean first unless the product label states that it cleans and disinfects in one step. Never mix bleach with toilet-bowl cleaner, vinegar, ammonia, or any other cleaning product.
Start With the Reason for Cleaning
The right routine depends on what happened since the last cleaning. A lightly used guest toilet does not need the same response as a shared family toilet during a stomach illness.
Use three practical levels:
- Routine cleaning: Remove visible soil, dust, splashes, and ordinary buildup. Give extra attention to frequently touched surfaces such as the flush handle or button, lid, and seat.
- Targeted disinfection: Clean first, then disinfect compatible high-touch or contaminated surfaces when someone is sick, a person at higher risk of illness uses the bathroom, or the product and relevant health guidance support it.
- Body-fluid cleanup: Treat visible vomit, feces, or blood as a separate event. Keep people and pets away, use appropriate protective equipment, remove the material without spreading it, and follow current public-health and product-label instructions for cleaning, disinfection, disposal, and handwashing.
The U.S. Centers for Disease Control and Prevention advises regular cleaning of high-touch household surfaces and cleaning other surfaces when visibly dirty or as needed. It recommends disinfection when someone is sick or at higher risk. This distinction prevents routine care from becoming unnecessary chemical exposure while still allowing a stronger response when the situation warrants it.
Keep Toilet Tools Separate
Cross-contamination often happens through tools rather than the toilet itself. A cloth used on the bowl rim or base should not return to the flush control, sink, faucet, or counter.
Set aside:
- a toilet brush that stays in the bathroom;
- several washable cloths in a colour reserved for the toilet, or disposable towels where appropriate;
- gloves if required by the product label or cleanup situation;
- a small soft brush or cotton swab for compatible hinge areas; and
- a waste bag when disposable material will be used.
Use a fresh cloth face for each zone, and replace the cloth when all clean faces have been used. If washable cloths are heavily contaminated with body fluids, follow local health guidance and laundering instructions rather than placing them casually with ordinary laundry.
Do not carry the toilet brush dripping across the room. After use, rinse it only as the product instructions allow, let excess water drain into the bowl, and allow it to dry before closing it into a holder. Do not rest it on the floor, counter, or tub edge.
Check the Toilet Before Applying Cleaner
A brief inspection can prevent both product damage and missed maintenance problems.
Look for:
- the manufacturer’s care instructions for the toilet, seat, bidet attachment, and any special coating;
- loose seat bolts or hinges;
- cracks in the bowl, tank, lid, or seat;
- water around the supply valve, hose, tank bolts, base, or floor;
- movement when the toilet is gently used normally;
- rust or finish damage on metal parts;
- deteriorated caulk at the base; and
- a continuously running or refilling tank.
Do not assume water around the base is cleaning residue. Dry the area and check whether it returns. An unexplained leak, a cracked fixture, a moving toilet, or recurring moisture is a repair decision, not a cue to add more cleaner.
Material differences matter. The bowl and outer body are often vitreous china, but the seat may be painted wood, plastic, resin, or a specialty surface. Hinges may combine plastic and plated metal. Bidet seats may include electronics, nozzles, sensors, filters, and manufacturer-specific cleaning modes. Use the care instructions for the actual component rather than extending bowl-cleaner directions to the entire fixture.
Prepare the Room and Products
Turn on the exhaust fan and increase ventilation as directed by the label. Remove toilet paper, towels, bath mats, waste bins, children’s items, and personal products that could be splashed or touched with contaminated gloves.
Read the labels before either product is opened. Confirm:
- the surfaces the product may be used on;
- whether it cleans, disinfects, or does both;
- required gloves, eye protection, and ventilation;
- dilution, application method, and contact time;
- whether the surface must remain visibly wet during disinfection;
- rinsing and drying directions; and
- storage and disposal instructions.
Use one product at a time. A toilet bowl may already contain cleaner from an earlier application, an in-tank tablet, or an automatic dispensing system. If you do not know what is present, do not add bleach, acid, vinegar, ammonia, or another chemical. Flush with plain water only if it is safe and consistent with the existing product instructions, ventilate the room, and resolve the uncertainty before continuing.
Health Canada warns that bleach mixed with acids or ammonia-containing cleaners can release toxic gases. Toilet-bowl cleaners are a particular concern because some are acidic. Never rely on colour, scent, or a front label to decide that two products are compatible.
Use a Clean-to-Dirty Exterior Sequence
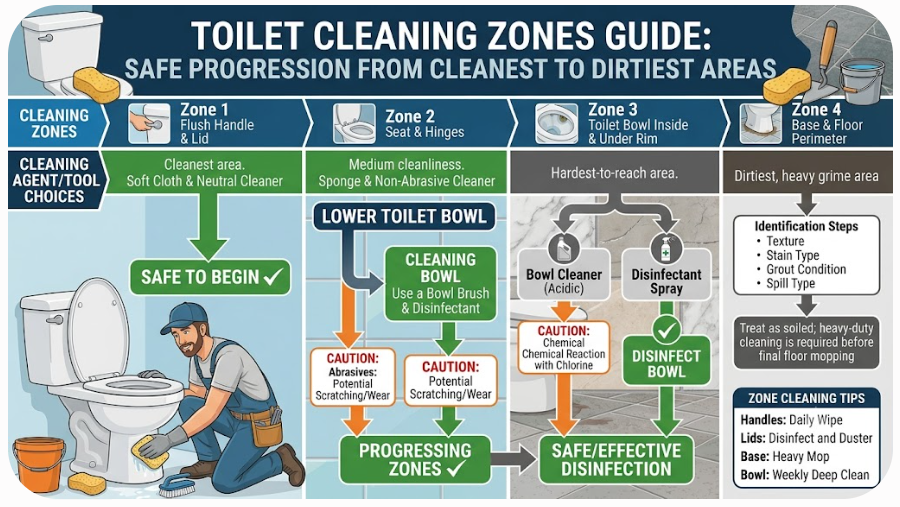
Clean the exterior before scrubbing the bowl so that bowl tools and splashes do not move back over cleaner high-touch areas. If a label directs a different sequence for a combined cleaner-disinfectant, follow that label.
1. Remove dry dust and hair
Vacuum or pick up hair and dust from behind the toilet, along the supply line, around the base, and on the nearby floor. Use an attachment suitable for the flooring. Removing dry debris first keeps it from becoming a wet film.
2. Clean the flush control and tank exterior
Use a compatible product on a clean cloth rather than spraying toward wall switches, open tank joints, bidet controls, or electrical parts. Wipe the flush handle or button, top and sides of the tank, and exposed plumbing that the product permits.
Do not remove the tank lid unless access is actually needed and you can lift and replace it safely. It can be heavy, fragile, and awkward to handle.
3. Clean the lid and upper seat
Wipe the top of the closed lid, then open it and clean the underside. Move to the top of the seat, followed by its underside. Use a fresh cloth face as contamination increases.
Seat manufacturers commonly call for mild soapy water, a thorough rinse or wipe with clear water, and drying with a soft cloth. Strong bowl cleaner, abrasive powder, solvent, or an incompatible disinfectant can damage the finish, hinges, or bumpers. If disinfection is needed, use only a product approved for that seat material and follow its required wet contact time.
4. Clean hinges and attachment points
Residue can collect around hinge caps, bolts, bumpers, and quick-release fittings. Use a soft tool that will not scratch the material. Do not force a quick-release seat or flood an electronic hinge area. If the seat is designed to lift off, follow its manual and reinstall it securely.
5. Clean the porcelain rim and outside of the bowl
Use a new cloth and a product approved for the exterior surface. Work around the upper rim, sides, front, lower curves, and rear connection areas that can be reached safely. Keep bowl cleaner inside the bowl unless its label expressly allows another use.
6. Wipe the base and nearby floor last
The base and floor are the dirtiest exterior zone in an ordinary routine. Use a fresh cloth or suitable floor tool. Clean around the base without flooding caulk, flooring seams, or the subfloor. Finish with the nearby floor, moving outward rather than dragging residue toward the rest of the bathroom.
If repeated staining appears at the base, dry the area and check whether moisture returns. Do not conceal a possible leak with fragrance, caulk, or repeated cleaning.
Clean the Bowl as Its Own Zone
Flush first if the bowl contains only ordinary waste and no chemical uncertainty. Lower the water level only if the product instructions require it and provide a safe method. Never improvise by adding incompatible chemicals.
Apply a toilet-bowl cleaner labelled for the toilet’s surface. Direct it only where the label permits, including under the rim if specified. Allow the stated contact time, but do not let the product remain longer or dry merely because buildup is stubborn.
Scrub with a long-handled toilet brush:
- start under the rim and around water outlets that are accessible;
- work around the bowl sides and waterline;
- scrub into the lower bowl and trap opening without forcing the brush; and
- flush as directed while controlling splashes.
Use moderate pressure. Wire brushes, metal tools, pumice, and abrasive pads can scratch or dull some surfaces and should not be treated as universal solutions. Mineral rings, rust-coloured marks, and recurring scale should be identified before escalating to an acid or abrasive product.
In-tank cleaning tablets also require caution. Some toilet manufacturers warn that chlorine-containing tank products can damage internal fittings and cause leaks. Check both the toilet warranty and the tablet instructions rather than assuming a product sold for toilets is compatible with every toilet.
Disinfect Only With the Full Process
Disinfection is not achieved by a quick spray and immediate wipe. Dirt can interfere with a disinfectant, and the product may need to keep a surface visibly wet for a specific contact time.
When disinfection is warranted:
- remove visible soil first unless the label specifies an approved one-step process;
- verify that the disinfectant is approved for the exact surface;
- apply the correct concentration and amount;
- keep the surface wet for the full labelled contact time;
- rinse food-contact, child-contact, seat, or other surfaces if the label requires it;
- ventilate and allow the surface to dry as directed; and
- wash your hands with soap and water after removing gloves.
Do not use one disinfectant indiscriminately across the porcelain, plastic seat, metal hinges, painted wall, flooring, and electronic bidet controls. Compatibility and contact-time requirements apply to each surface.
If someone in the household has a confirmed infectious illness, follow guidance for that illness. Some organisms require particular active ingredients or procedures; a general-purpose routine should not replace disease-specific public-health advice.
Choose a Frequency That Matches Use
There is no single household schedule that fits every toilet. Base frequency on use, visible soil, household health, and how quickly residue returns.
A practical starting pattern is:
- As needed: Remove visible splashes, soil, or waste promptly and safely.
- Several times a week or more often in a busy shared bathroom: Wipe compatible high-touch surfaces such as the flush control, lid, and seat when use patterns justify it.
- About weekly: Complete the exterior-and-bowl routine for an ordinarily used household toilet, then adjust based on results.
- Immediately under a separate protocol: Respond to vomit, feces, blood, illness, or another contamination event.
- Periodically: Inspect behind the toilet, around the base, supply line, shutoff valve, hinges, caulk, and floor for leaks or deterioration.
A low-use toilet may need less frequent cleaning but still needs inspection and flushing consistent with plumbing and manufacturer guidance. A toilet shared by young children, many people, or someone who is ill may need attention more often.
The best schedule is the least intensive routine that keeps the fixture visibly clean, manages actual hygiene needs, and reveals maintenance problems early.
Avoid Common Routine Failures
Using one cloth for the whole bathroom
This can transfer contamination from the seat or base to the flush control, sink, or counter. Reserve tools for the toilet and move from cleaner to dirtier zones.
Spraying everything directly
Overspray can reach floors, walls, metal, electronics, towels, or products that are not compatible. Apply cleaner to a cloth when the label permits and direct bowl products only into the bowl.
Treating fragrance as evidence of cleanliness
A strong scent does not show that soil was removed, that a disinfectant stayed wet long enough, or that a leak was corrected. Judge the process, not the smell.
Mixing products to save time
This is never a shortcut. It can generate toxic gas, damage surfaces, and make the actual chemical exposure impossible to predict.
Closing wet tools into a holder
A brush stored wet in a closed container stays damp and can create odour. Drain and dry it without contaminating other surfaces.
Scrubbing a maintenance problem
Water at the base, a loose toilet, a running tank, damaged caulk, or a cracked part requires investigation. Repeated wiping may hide the evidence without solving the cause.
The Practical Routine
Use this order as a default, then adjust it to the product and fixture instructions:
- Decide whether the task is routine cleaning, targeted disinfection, or body-fluid cleanup.
- Ventilate, remove nearby items, and read every label.
- Keep bowl products and exterior products separate; never mix chemicals.
- Inspect for cracks, movement, loose parts, and leaks.
- Remove dry dust and hair.
- Clean the flush control, tank, lid, seat, and hinges with compatible products.
- Clean the exterior rim, bowl sides, base, and nearby floor, changing cloth faces or tools by zone.
- Clean the inside of the bowl with its own labelled product and brush.
- Disinfect only when warranted, using the correct surface, concentration, and full contact time.
- Rinse or dry as labels require, clean reusable tools appropriately, and wash your hands.
- Escalate unexplained water, cracks, movement, or recurring stains to maintenance rather than stronger cleaning.
A good toilet routine is repeatable because each step has a purpose. It removes ordinary soil without turning every cleaning into a disinfection event, and it becomes more protective—not more aggressive—when illness or contamination changes the situation.
FAQ
What is the best order for cleaning a toilet?
Inspect and prepare first, then remove dry debris. Clean the flush control, tank, lid, seat, hinges, exterior rim, bowl exterior, base, and nearby floor from cleaner to dirtier zones. Clean the inside of the bowl separately with its own brush and labelled product. Change cloth faces or tools so you do not carry contamination back to high-touch areas.
How often should a household toilet be cleaned?
About weekly is a practical starting point for a normally used household toilet, with visible soil removed as needed. Busy shared toilets may need high-touch surfaces cleaned more often. Illness, body-fluid contamination, young children, or a higher-risk household member can justify a different schedule or targeted disinfection.
Do I need to disinfect the toilet every time I clean it?
Not necessarily. Routine cleaning removes ordinary dirt and many germs. Disinfection is more relevant when someone is sick, a household member is at higher risk, body fluids contaminate a surface, or public-health guidance recommends it. When disinfecting, clean first unless the label approves a one-step process and follow the full contact time.
Can I use toilet-bowl cleaner on the seat and outside of the toilet?
Only if the label and fixture manufacturer specifically approve those surfaces. Bowl cleaner may damage plastic seats, metal hinges, coatings, flooring, or electronic bidet parts. Mild soapy water is a common manufacturer recommendation for many toilet seats, followed by rinsing or wiping with clean water and drying.
Can I mix bleach with toilet-bowl cleaner?
No. Some toilet-bowl cleaners contain acid, and mixing acid with bleach can release toxic chlorine gas. Bleach can also react dangerously with ammonia-containing cleaners. Health Canada advises never mixing bleach with any other cleaning product.
Should I use an in-tank toilet-cleaning tablet?
Check the toilet manufacturer’s instructions and warranty first. Some manufacturers warn that chlorine-containing in-tank cleaners can damage tank fittings and cause leakage. A product marketed for toilets is not automatically compatible with every model.
How should I store a toilet brush after cleaning?
Remove cleaner as its label directs, let excess water drain into the bowl, and allow the brush to dry without touching the floor, counter, tub, or other bathroom tools. Store it in a dedicated holder only after it has drained and dried as fully as practical.
Sources
- CDC – When and How to Clean and Disinfect Your Home
- Health Canada – Use Household Chemicals Safely
- Transport Canada / CANUTEC – Improper Mixing of Common Household Cleaning Products
- Kohler – Cleaning Instructions for Vitreous China Toilets and Bidets
- American Standard – What Cleaners Do I Use to Clean My Toilet Seat?
- Kohler – Family Care and Cleaning Guidance