Dark grout can look like a simple cleaning problem, but stronger cleaner and harder scrubbing are not always the answer. The joint may be holding surface soil, absorbing a stain, reacting to the wrong product, or physically breaking down. Treating all four conditions alike can turn discoloration into permanent damage.
The safest approach is to inspect the grout while it is dry, start with a compatible low-risk cleaner, and judge the result only after the test area has dried again. This article will help you decide what can be cleaned, when to stop escalating, and when the joint needs repair rather than another product.
Quick Answer
For routine bathroom grout, remove dry debris first. Test a pH-neutral cleaner that is approved for both the grout and the adjoining tile, then agitate the joint gently with a non-metallic nylon brush. Pick up the dirty solution, rinse as the label directs, and let the grout dry before judging its colour.
Do not use vinegar or another acidic cleaner as a default, especially on cement-based grout or natural stone. Never mix bleach with any other cleaning product. Stop cleaning if the grout is cracked, soft, powdery, missing, separating from the tile, or repeatedly wet for reasons you cannot explain.
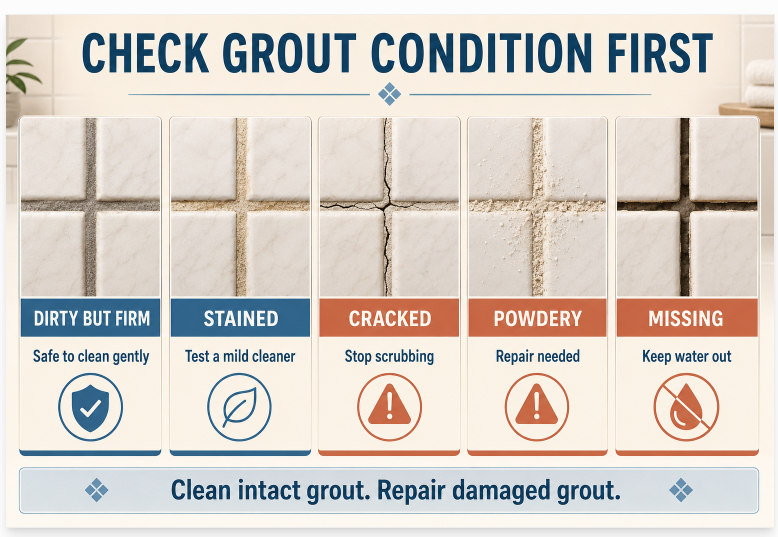
First Decide: Is the Grout Dirty or Damaged?
Inspect the area in good light after it has had time to dry. Wet grout normally looks darker, so a joint viewed immediately after a shower or cleaning test can appear more stained than it really is.
Look across several joints and compare high-use areas with protected ones. Different patterns suggest different problems:
- Gradual gray or brown darkening in traffic areas often points to ordinary soil.
- Dull, sticky buildup near a tub or shower may involve soap, body oils, or personal-care products.
- A sharply localized mark may be an absorbed spill or colourant.
- Pale, crusty residue may be mineral buildup, efflorescence, or construction residue; these are not interchangeable.
- Irregular pink, orange, or dark marks in persistently damp areas may involve biological growth or staining.
- Cracks, gaps, pits, crumbling edges, or loose material point to deterioration rather than dirt.
- Colour variation that follows the installation rather than use may come from curing, mixing, previous treatment, or the original grout colour.
Touch only lightly. If a dry finger or soft cloth lifts powder, flakes, or grains from the joint, stop. A cleaner cannot restore missing binder or rebuild a failing joint. More scrubbing may widen the damage.
Also check whether the line is actually grout. Joints where a wall meets a tub, shower base, floor, or another wall are often filled with flexible sealant rather than rigid grout. A split or detached flexible joint is a repair issue. It should not be scrubbed, scraped, or sealed as though it were cement grout.
The key decision is simple: firm material with removable surface soil is a cleaning candidate. Material that is moving, opening, softening, or disappearing is not.
Identify Both Sides of the Joint
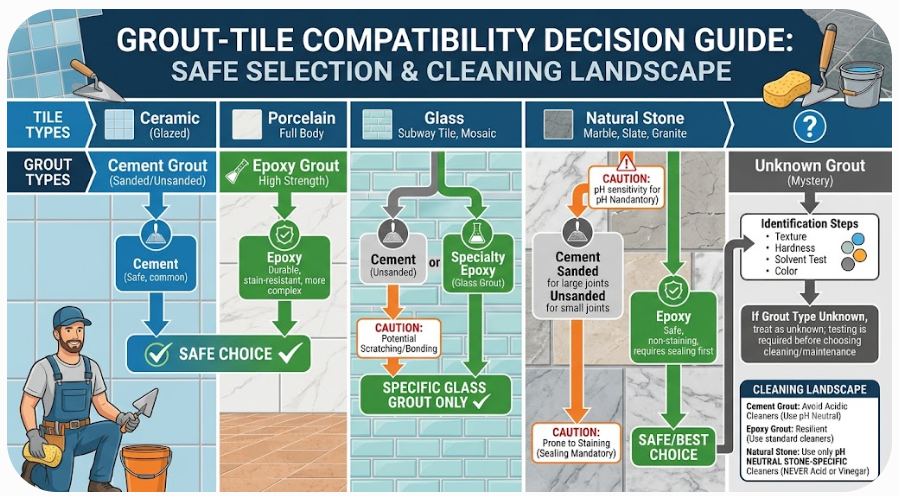
Grout cleaning is also tile cleaning because the product and rinse water will touch both materials. A method that a grout joint tolerates may still etch stone, dull a decorative finish, affect metal trim, or damage a coating.
If available, check renovation records, a leftover package, an installer invoice, or the builder’s specifications. These may identify the grout as cement-based, epoxy, single-component, or another specialty formulation. They may also state whether it was sealed and which cleaners the manufacturer permits.
Appearance alone is not a dependable identification method. Cement-based grout is common and often porous, but modern cement formulations vary. Epoxy grout is less absorbent than conventional cement grout and is maintained differently. Some ready-to-use or high-performance grouts do not need the penetrating sealer commonly sold for porous cement grout.
Before selecting a cleaner, ask:
- Is the adjoining tile ceramic, porcelain, glass, or natural stone?
- Is the grout type known, or must the method be safe for an unknown joint?
- Is there a sealer, colourant, topical coating, or refinished tile surface?
- Will runoff touch caulk, metal, painted trim, acrylic, fiberglass, or another sensitive material?
- Do the tile, grout, or sealer manufacturers provide care instructions?
When the materials are uncertain, work to the limits of the most sensitive known surface. If the grout sits beside marble, limestone, travertine, or another acid-sensitive stone, for example, the stone’s restrictions govern the cleaning choice.
Use a Low-Risk Cleaning Sequence
Progressive cleaning gives you information at each step. It also prevents the common mistake of using several strong treatments before you know whether the first one caused a colour or surface change.
1. Read the label and prepare the area
Choose a cleaner labelled as compatible with the tile and grout. Follow its directions for dilution, ventilation, gloves, eye protection, contact time, rinsing, and disposal. Product labels take priority over general household advice.
Run the exhaust fan and increase ventilation as directed. Remove bottles, mats, towels, toys, and other items that can block access or be exposed to cleaner. Keep children and pets out of the work area until the product has been removed and the surface is ready for normal use.
2. Remove loose debris before adding liquid
Vacuum or sweep up hair, dust, and grit. This keeps loose material from turning into muddy residue and reduces the chance of dragging grit across the tile face.
Use an attachment suitable for the surface. Polished or delicate tile can be scratched by grit trapped under a hard vacuum head or dirty brush.
3. Test a neutral cleaner in a small area
For ordinary soil, begin with warm water and a pH-neutral cleaner approved for both materials. Use the concentration on the label; more product does not necessarily clean better and can leave a film that attracts new soil.
Choose a small, inconspicuous section that includes both grout and tile. Apply only enough solution to wet the working area. Do not flood the floor or saturate a damaged joint.
4. Allow only the stated contact time
Some products need time to loosen soil, but letting a cleaner dry on the surface is not a substitute for following its directions. Keep the test controlled and do not extend the dwell time on your own.
5. Agitate with moderate pressure
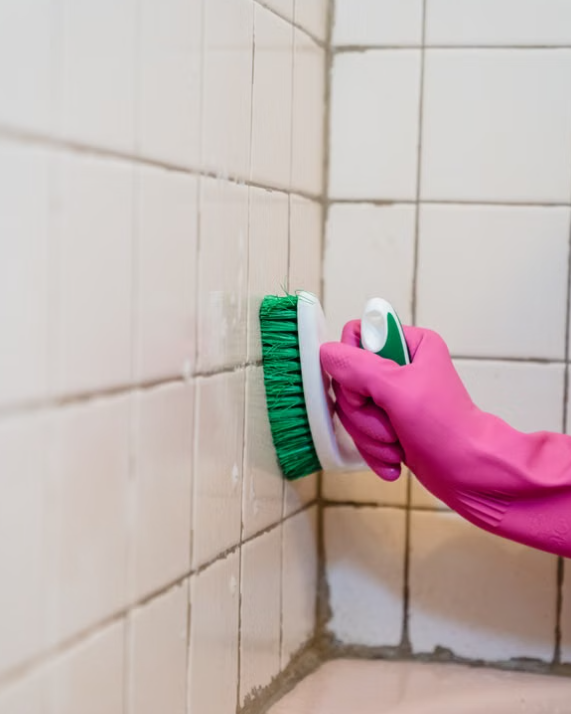
Use a small non-metallic nylon grout brush or another tool the surface manufacturer approves. Work along the joint rather than grinding broadly across the tile.
Avoid wire brushes, metal picks, razor blades, and highly abrasive pads. They can erode grout, scratch tile, strip a coating, and mark nearby fixtures. Power scrubbers can also concentrate more force than expected on a narrow or weakened joint.
Stop immediately if the joint begins to powder, pit, or break away.
6. Remove the dirty solution
Do not let loosened soil settle and dry back into the joint. Lift the solution with clean microfiber cloths, a suitable mop, or a wet vacuum approved for the area. Replace dirty cloths or water instead of spreading the residue to adjacent grout.
The Tile Council of North America specifically recommends lifting dirty cleaning water and rinse water from grout rather than leaving it on the surface. The practical point is not that every household needs a wet vacuum. It is that the contamination must be removed, not merely moved.
7. Rinse as directed and let the area dry
If the label calls for rinsing, use clean water and control the runoff. Remove residue from tile, trim, fixtures, and flexible joints. Then ventilate the room and let the test section dry fully.
Only compare the treated and untreated areas after both are dry. If the test joint is cleaner and remains firm, repeat the same process in manageable sections. If it barely changes, identify the remaining mark before increasing strength.
Why Vinegar Is Not a Default Grout Cleaner
Vinegar is often recommended as an inexpensive universal cleaner, but grout and tile chemistry matter more than familiarity.
The Tile Council of North America explains that cementitious grout is alkaline and can be dissolved by acids. Repeated exposure can roughen or weaken an unprotected cement-based joint even if the first treatment makes it appear brighter. Acid can also dull or etch marble, limestone, travertine, and other calcareous stone beside the grout.
Specialized acidic cleaners do have limited professional or manufacturer-directed uses, such as treatment of a specifically identified mineral or construction residue on compatible materials. That is different from applying household vinegar to an unknown bathroom installation.
Baking soda does not make an acid-caused loss of grout reversible. Mixing familiar ingredients can also leave residue while making the actual cleaning strength unpredictable.
Unless the grout, tile, and any sealer manufacturer expressly approve the application, do not use vinegar, lemon juice, acidic toilet-bowl cleaner, or a descaling acid on the joint.
Use Bleach and Other Strong Products Only With a Clear Reason
Whitening a joint is not the same as cleaning it. Chlorine bleach may affect coloured grout, sealers, coatings, metal, and nearby materials, and it will not correct an installation that stays damp.
If a manufacturer-approved product containing bleach is appropriate for a specific surface and purpose, follow its exact label. Do not increase the concentration or contact time. Maintain ventilation and use the specified protective equipment.
Most importantly, never mix household bleach with another cleaning product. Health Canada warns that mixing bleach with acids or ammonia-containing cleaners can produce toxic gases. That includes vinegar, some toilet cleaners, some glass cleaners, and other products whose ingredients may not be obvious from the front label. Use one product at a time, keep it in its original container, and rinse or remove it exactly as directed before considering any later treatment.
Hydrogen peroxide and baking soda are not universally safe simply because they are common household products. Peroxide may affect colour, while powders and pastes can abrade polished or coated surfaces and lodge in porous joints. Use them only when the relevant surface guidance permits them, and test first.
Escalate by the Type of Remaining Soil
If the neutral test does not solve the problem, pause before choosing something stronger. A useful escalation answers two questions: what is probably left, and is the next product designed for it?
Oily or product-based buildup
Body oils, cosmetics, and personal-care residue may respond to a non-acidic alkaline tile-and-grout cleaner approved for the installation. These cleaners may be more concentrated than routine products, so dilution, dwell time, pickup, and rinsing matter. Test for colour or finish changes.
A stain absorbed into porous grout
Repeated surface scrubbing may not remove colour that has penetrated a porous joint. Depending on the grout and stain, a manufacturer-approved stain treatment, poultice, grout colourant, or professional service may be more appropriate. Colouring over a joint is a finishing choice, not proof that the underlying condition has been corrected.
Pale mineral or construction residue
Hard-water scale, efflorescence, and grout haze can look similar but have different causes and treatments. Do not identify them only by colour and then reach for acid. Check the product history and manufacturer guidance, especially when natural stone or an unknown sealer is present.
Recurring dark, pink, or orange staining
A compatible surface cleaner may remove visible residue, but repeated staining signals a moisture condition that cleaning alone may not solve. Improve drying and investigate persistent dampness. If staining returns quickly, extends beyond a small surface area, accompanies odour or soft materials, or appears to come from behind the tile, stop treating it as routine grout maintenance and seek appropriate assessment.
This article does not attempt to resolve full-room moisture control or mould remediation. The immediate grout decision is to avoid repeated chemical escalation when the real problem is continuing moisture.
Decide Whether Sealing Would Actually Help
A penetrating sealer can make some porous cement-based grout more resistant to water- and oil-based staining and easier to maintain. It is not a waterproofing repair, a crack filler, or a requirement for every grout product.
Some cement grouts are designed to accept a compatible sealer. Epoxy and certain high-performance cement or ready-to-use grouts may not need one. One current cement-based grout product, for example, is specifically marketed as requiring no sealer; that is why the product instructions matter more than a universal resealing rule.
Before sealing:
- identify the grout as far as possible;
- confirm that its manufacturer recommends or permits the chosen sealer;
- verify compatibility with the tile and any existing treatment;
- clean the joint without leaving residue;
- allow the grout to dry for the period required by the sealer label;
- test for darkening, sheen, or other appearance changes; and
- follow the application, removal, ventilation, and cure instructions.
Do not seal over damp, dirty, stained, soft, or crumbling grout. Sealer can preserve an unwanted appearance or apply unevenly, but it cannot restore structure or stop water entering through a failed joint.
There is no reliable annual schedule that fits every bathroom. Exposure, grout formulation, sealer chemistry, cleaning products, and use all affect performance. Follow the specific product guidance and assess the joint rather than resealing automatically.
Know When Cleaning Should End
Stop cleaning and consider repair or professional assessment when you find:
- cracks that remain or return;
- open gaps or missing sections;
- grout that is soft, powdery, flaking, or deeply pitted;
- separation between the grout and tile;
- loose, hollow-sounding, or moving tile;
- a failed flexible joint at a change of plane;
- persistent wetness, odour, or staining that appears to come from behind the surface; or
- widespread colour or surface loss after previous chemical use.
More cleaner cannot correct movement, missing material, a failed sealant joint, or hidden moisture. Sealer cannot bridge those failures either. If the cause is unclear, contact the installer, grout or tile manufacturer, a qualified tile professional, or another appropriate building professional before removing or recoating the joint.
Cosmetic colour variation may be acceptable when the grout is firm and dry. The aim is not a perfectly uniform line at any cost. It is a sound joint that can be maintained without being progressively worn away.
Keep Grout Cleaner With Less Aggressive Work
Routine care reduces the need for risky deep-cleaning attempts:
- remove hair, dust, and grit before they bind to damp residue;
- wipe coloured spills and personal-care products promptly;
- use a compatible neutral cleaner before buildup becomes heavy;
- pick up dirty cleaning solution instead of allowing it to dry in the joints;
- remove standing water and support normal bathroom drying;
- avoid switching among unlabelled homemade mixtures;
- inspect grout and flexible joints periodically for gaps, softness, and movement; and
- keep the product names or care instructions from future renovation work.
These habits do not guarantee that grout will remain its original colour. They make changes easier to interpret. When a previously firm, dry joint begins to crack or stay damp, you are more likely to recognize that the decision has shifted from cleaning to investigation.
The Practical Decision
Use this order:
- Inspect the grout dry.
- Separate surface soil from cracks, softness, gaps, or movement.
- Identify the grout, tile, and existing treatments as far as possible.
- Read the cleaner label and follow its safety directions.
- Remove dry debris.
- Test a compatible neutral cleaner in a small area.
- Agitate gently with a nylon brush, then lift the dirty solution.
- Rinse as directed and let the joint dry before judging it.
- Escalate only after identifying the remaining soil and checking compatibility.
- Seal only when the grout and sealer instructions support it.
- Stop when the joint shows damage or recurring moisture rather than removable dirt.
The best method is not the one that makes grout look whitest in the shortest time. It is the one that removes what is removable while leaving the joint strong enough to keep doing its job.
FAQ
What is the safest way to clean bathroom grout?
Inspect the grout when it is dry, remove loose debris, and test a pH-neutral cleaner approved for both the grout and adjoining tile. Agitate gently with a non-metallic nylon brush, lift the dirty solution, rinse as directed, and let the joint dry before deciding whether it needs stronger treatment.
Can vinegar damage grout?
Yes. Acids can dissolve or weaken cement-based grout, and vinegar can also etch marble, limestone, travertine, and other calcareous stone. Do not use an acidic cleaner unless the grout, tile, and any sealer manufacturer specifically approve it for that application.
Can I mix bleach with another grout cleaner?
No. Health Canada warns that bleach mixed with acidic or ammonia-containing cleaners can create toxic gases. Never mix bleach with vinegar, toilet cleaner, glass cleaner, ammonia, or any other cleaning product. Use one product at a time and follow its label.
What kind of brush should I use on grout?
A small non-metallic nylon grout brush is a conservative starting choice when it is compatible with the tile. Avoid wire brushes, metal tools, and highly abrasive attachments. Stop if the grout powders, pits, or breaks away.
Does all bathroom grout need to be sealed?
No. Some porous cement-based grout may benefit from a compatible penetrating sealer, while epoxy and certain high-performance or ready-to-use grouts may not need one. Follow the specific grout and sealer manufacturers’ instructions rather than a universal schedule.
How can I tell whether grout needs cleaning or repair?
Dirty grout generally remains firm and may improve after compatible cleaning. Cracked, missing, soft, powdery, separating, or persistently damp grout may require repair or investigation instead of stronger cleaning.
Why does grout look darker after cleaning?
Wet grout normally looks darker. Retained cleaner or dirty rinse water can also change its appearance. Let the test area dry fully before comparing it with untreated grout or deciding that the stain remains.
Sources
- Tile Council of North America – Cleaning Grout
- Health Canada – Use Household Chemicals Safely
- Transport Canada / CANUTEC – Improper Mixing of Common Household Cleaning Products
- Natural Stone Institute – Learn About Cleaning Products for Natural Stone
- Custom Building Products – Aqua Mix Grout Sealer
- Custom Building Products – Prism Ultimate Performance Grout
More in This Cluster: Bathroom Cleaning
- How to Remove Soap Scum Without Damaging Your Bathroom
- How to Clean Grout Without Damaging It (you are here)
- Toilet Cleaning Routine
- How to Prevent Bathroom Mould
- Best Cleaning Order for a Bathroom
- How to Clean Glass Shower Doors
- When to Replace Bathroom Cleaning Tools