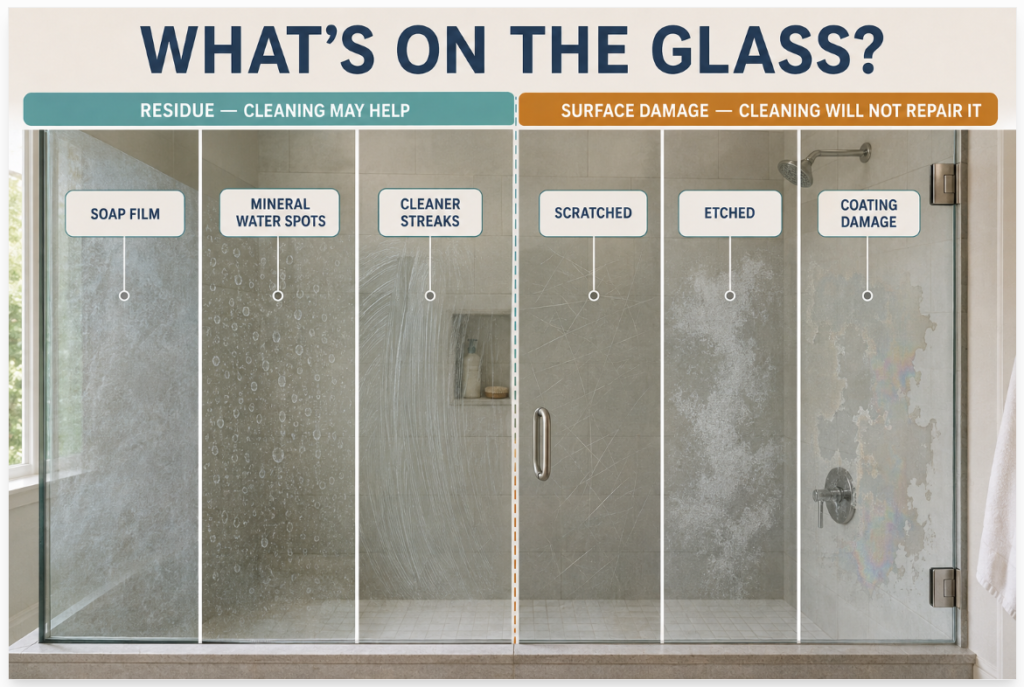
A glass shower door can still look cloudy after it has been wiped. The remaining film may be soap residue, dried minerals, leftover cleaner, or damage that cleaning will not reverse. Treating all four as the same problem often leads to stronger products, harder scrubbing, and unnecessary risk to coatings, metal finishes, seals, and nearby stone.
The safer approach is diagnostic: identify the door and surrounding materials, start with the mildest compatible method, inspect the result when dry, and escalate only where the evidence supports it.
Quick Answer
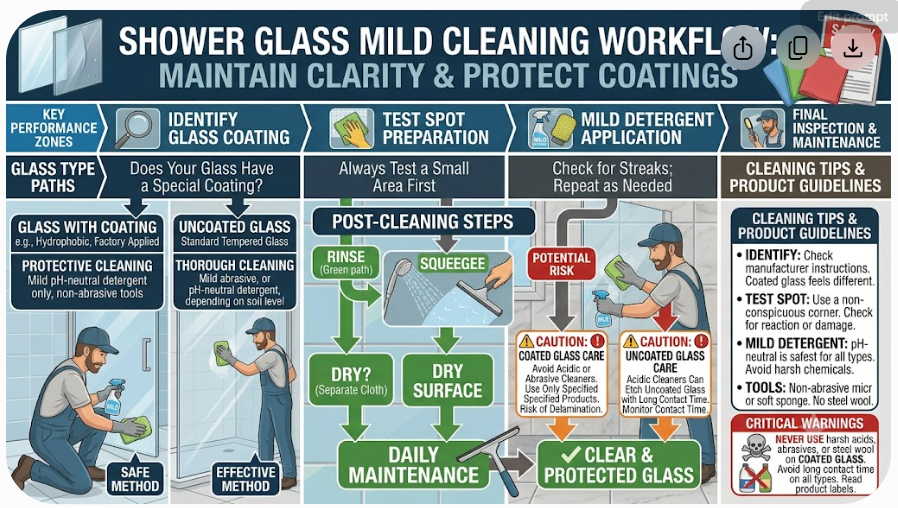
Check the shower-door manufacturer’s care instructions and determine whether the glass has a water-repellent coating. Ventilate the bathroom, rinse away loose residue, and wash a small section with warm water, mild detergent, and a soft non-abrasive cloth or sponge. Rinse thoroughly, squeegee, and dry with a clean soft cloth.
If cloudiness remains, do not immediately reach for vinegar, abrasive powder, a rough scrubber, or a razor blade. First decide whether the residue is likely soap film, mineral deposit, cleaner residue, or permanent etching. Test any approved stronger method in an inconspicuous area, keep it away from incompatible stone and finishes, and never mix cleaning products—especially bleach with glass cleaner, ammonia, acids, or vinegar.
Start With the Door, Not a Cleaning Recipe
Shower enclosures are assemblies, not single sheets of generic glass. One door may combine tempered glass, a factory-applied water-repellent coating, anodized or plated metal, painted hardware, vinyl sweeps, rubber gaskets, silicone sealant, rollers, and a track. The surrounding shower may add acrylic, fiberglass, ceramic tile, grout, or natural stone.
A product that is acceptable on bare glass can be prohibited on a coating or damaging to an adjoining material. Delta’s current shower-door care guidance, for example, recommends mild detergent or warm soapy water, a non-abrasive cloth or sponge, thorough rinsing, and a small inconspicuous test.[1] MAAX advises mild products and non-abrasive tools for its protected glass and emphasizes drying after use.[2] These are product-specific instructions, but they establish a sound starting principle: the door manufacturer’s care instructions outrank a universal household recipe.
Look for the model name on purchase records, installation documents, warranty information, or a label on the enclosure. A small coating sticker may identify which face received a treatment. If the model is unknown, assume less rather than more: use a mild, non-abrasive first pass and avoid improvised chemical escalation until the materials are identified.
Inspect the door before cleaning. Stop and seek repair guidance if the glass is chipped or cracked, an edge is damaged, hardware is loose, a panel shifts unexpectedly, or a door no longer opens and closes correctly. Cleaning does not correct a structural or installation problem.
Decide What Is on the Glass
You do not need laboratory certainty. You need enough evidence to choose the next safe step.
Soap and body-product film
Soap, shampoo, conditioner, body oils, and other products can leave a smeared or waxy-looking film. It may feel slippery when rewetted and often improves with mild detergent because detergent helps lift oily and surfactant residue. The film may be heavier low on the door or near the side used most often.
Dried mineral deposits
Water droplets can leave pale spots, rings, or a rougher crust as they dry. The pattern often follows repeated splashing and evaporation. A mild wash may remove associated soap but leave the mineral outline behind. That does not mean an acidic cleaner is automatically safe; it means a mineral-removal step may be worth considering only if the door, coating, frame, sealant, and nearby materials permit it.
Cleaner residue
Too much product, incomplete rinsing, a dirty cloth, or cleaning in sections that dry before rinsing can leave haze or streaks. If the surface improves when thoroughly rinsed and dried with a fresh cloth, the problem was not a deposit requiring stronger chemistry.
Etching, scratching, coating wear, or glass changes
If the mark remains after compatible cleaning, feels different from a removable deposit, or appears as fine scratches or dull patches, more scrubbing may worsen it. Permanent surface change can resemble dirt. A failing coating may also create uneven wetting or appearance. At that point, contact the door or coating manufacturer, installer, or a qualified glass professional before continuing to escalate.
Do not use colour alone to identify mould or another contaminant in seals and tracks. Growth, damaged sealant, or moisture behind an enclosure is a separate condition from ordinary glass haze.
Gather a Small, Controlled Set of Supplies
For the first pass, use only what the product instructions allow. A typical mild setup is:
- warm water;
- a manufacturer-compatible mild detergent;
- two or more soft, non-abrasive cloths or sponges;
- a squeegee with a smooth, undamaged blade;
- a small container or controlled rinse method;
- label-specified gloves or eye protection, if required;
- dry towels to protect the floor and vulnerable adjoining materials.
Avoid steel wool, abrasive pads, scouring powder, rough brushes, and sharp blades unless the shower-door manufacturer explicitly approves the exact tool and method. Even when a blade is promoted for ordinary window glass, shower glass may be coated, textured, treated, scratched, or close to vulnerable seals. Scratching is not a reasonable trade for faster residue removal.
Use one product at a time. Health Canada warns never to mix bleach with other cleaning chemicals, especially glass cleaners and products containing ammonia or acids such as vinegar, because toxic gases can result.[3] The fact that two ingredients are common household products does not make their combination safe.
Use a Mild First Pass
1. Ventilate and protect the area
Run an exhaust fan that vents outdoors or open a door or window when conditions permit. Remove bottles and loose items from the enclosure. Place towels where runoff could reach vulnerable flooring, cabinetry, painted trim, or natural stone.
Do not stand on a wet tub edge or improvised platform to reach the top of the door. Use a stable, suitable access method or leave unreachable work to someone equipped to do it safely.
2. Remove loose material
Rinse the interior face with warm—not extreme—water if the door instructions and enclosure design permit it. Avoid forcing water under seals, through gaps, or over a track that can overflow onto the bathroom floor. For enclosures where spraying would create runoff problems, use a damp cloth instead.
3. Wash a test section
Mix or apply the mild detergent only as its label directs. Test a small, inconspicuous area that includes the type of glass being cleaned but does not expose a vulnerable metal finish or stone edge.
Wipe gently with a soft cloth or non-abrasive sponge. Let chemistry and repeated light passes do more of the work than pressure. Keep the solution from drying on the surface unless the product instructions explicitly permit a waiting period.
4. Rinse completely
Remove detergent from the test section with clean water or a clean damp cloth. Rinse the cloth frequently. A cloth already loaded with residue can redistribute haze across the door.
5. Squeegee and dry
Draw the squeegee in controlled overlapping passes, wiping the blade between passes if it carries residue. Follow with a clean soft cloth at edges, hardware, and remaining wet areas. Drying reveals the actual result; evaluating wet glass can hide both residue and damage.
If the test section is clear when dry, repeat the same method across the remaining compatible glass. Work in manageable sections rather than coating the entire enclosure and allowing product to dry.
Escalate According to What Remains
Escalation should be narrow. Treat only the residue that survived a correct mild wash, not the whole enclosure by default.
If a greasy or smeared film remains
Repeat the mild detergent step with fresh solution and clean cloths. Too little detergent may fail to lift body-product residue; too much may leave its own film. Follow label dilution and rinsing directions rather than estimating by foam.
Check whether a bath oil, conditioner, bar soap, or spray product is repeatedly coating the door. If so, reducing what reaches the glass and rinsing promptly may be more effective than increasing cleaner strength.
If distinct mineral spots remain
Consult the shower-door or coating instructions for an approved mineral-deposit remover and application time. Some manufacturers permit a diluted vinegar method for particular products; others specify mild cleaners or branded compatible products. Permission from one manufacturer is not permission for every enclosure.
If an approved acidic method is used, isolate it from bleach and other cleaners, ventilate, follow the stated dilution and time, prevent runoff, rinse completely, and dry. Never apply vinegar simply because the centre of the glass appears tolerant. The liquid can run onto metal, grout, stone, sealant, or an acrylic base.
The Natural Stone Institute warns that products containing vinegar, lemon, or other acids may dull or etch calcareous stone.[4] Marble, limestone, and travertine near the door therefore change the decision even if the glass itself could tolerate an acidic product. Protecting adjoining material is part of cleaning the door correctly.
If haze appears after cleaning
Rinse again with clean water and use fresh cloths. Review the cleaner’s dilution and rinsing directions. Also check the squeegee blade: a dirty or damaged edge can drag residue or leave repeated lines. This article does not set the retirement schedule for the tool, but a tool that visibly scratches, sheds, smells, or no longer performs safely should not remain in use merely because it is familiar.
If no compatible method changes the mark
Stop. Photograph the door in dry, indirect light and record the products and tools already used. Contact the manufacturer, installer, coating provider, or glass professional. Continuing with stronger acids, abrasives, polishing compounds, or blades can convert an appearance problem into irreversible damage and may complicate a warranty question.
Clean Frames, Tracks, Seals, and Hardware Separately
Do not use the glass-cleaning decision as permission to apply the same product everywhere.
For metal frames and hardware, follow the finish manufacturer’s instructions. Mild detergent and a soft cloth are a common starting point, but plated, painted, anodized, and specialty finishes can have different restrictions. Do not leave acidic or alkaline residue around fasteners, hinges, rollers, or handles.
For tracks, first remove loose hair and debris without damaging guides or drainage paths. Then use a compatible damp-cleaning method and dry the track. Do not flood it. Standing water may escape the enclosure or hide a drainage, seal, or alignment problem. Some door designs have detachable guides or special access features; use them only as the manufacturer directs.
For sweeps and gaskets, inspect for splitting, stiffness, displacement, trapped residue, or loss of contact. Clean only with a compatible product. A seal that no longer contains water is a maintenance or replacement issue, not a reason to pack the gap with stronger cleaner.
For silicone or other sealant, gentle surface cleaning is different from repairing failed material. Separation, cracking, persistent growth beneath the surface, or water appearing outside the enclosure requires diagnosis. Do not scrape out structural or waterproofing sealant without understanding the installation and replacement process.
Prevent the Next Layer From Forming
Maintenance is most effective before droplets dry.
After showering, use a compatible squeegee on the glass and wipe water from edges and hardware with a soft cloth. MAAX and Kohler both recommend routine water removal for their shower products, while Delta recommends squeegeeing to help prevent spotting.[1][2][5] This is not a promise that every door must be dried after every use. It is a trade-off: a short drying step generally reduces the frequency and intensity of later deposit removal.
Ventilate the bathroom so the enclosure and surrounding surfaces can dry. Keep the track’s intended drainage path open. Rinse product splashes before they harden, and do not let wet cloths or a squeegee rest against sealant or metal.
If spotting returns rapidly, consider the pattern rather than assuming poor cleaning. Harder water, frequent use, heavy product application, ineffective ventilation, and a worn or absent glass treatment can all increase maintenance. A water-repellent coating can reduce adhesion and spotting, but it still has care restrictions and does not make the glass maintenance-free.
Do not apply an aftermarket coating, automotive water repellent, wax, or polish without confirming compatibility with the glass, existing treatment, enclosure, ventilation, and warranty. Adding a layer is a product decision, not a neutral final cleaning step.
[

Know When Cleaning Is No Longer the Main Task
Seek repair or professional guidance when:
- the glass is chipped, cracked, deeply scratched, or damaged at an edge;
- a door binds, drops, shifts, or will not remain correctly aligned;
- hinges, rollers, brackets, anchors, or handles are loose;
- water escapes despite normal closure and a clear drainage path;
- a sweep, gasket, or seal has failed;
- cloudiness appears permanent or the coating seems uneven or damaged;
- residue is inaccessible without disassembling safety-critical hardware;
- moisture, mould, or material damage extends behind the enclosure.
Tempered shower glass is a safety component. Do not drill, grind, polish, remove hardware, or disassemble a heavy panel as a casual cleaning experiment.
The clearest shower door is not the one cleaned with the strongest available method. It is the one whose residue was correctly identified, whose materials were respected, and whose cleaning stopped before preventable damage began. Start mild, inspect dry, escalate narrowly, and make water removal—not aggressive rescue cleaning—the centre of ongoing care.
FAQ
What is the safest way to clean glass shower doors?
Check the door manufacturer’s instructions and whether the glass has a coating. Start with warm water, a compatible mild detergent, and a soft non-abrasive cloth or sponge. Test a small area, rinse completely, squeegee, and dry. Escalate only if a specific residue remains and the stronger method is approved for every material it may touch.
Can I use vinegar on glass shower doors?
Only when the shower-door or coating instructions permit it and runoff will not contact an incompatible material. Some manufacturers allow diluted vinegar for particular doors, but it can damage some coatings, metal finishes, sealants, and nearby calcareous stone such as marble, limestone, or travertine. Never use or mix vinegar where bleach or bleach residue may be present.
How do I tell soap scum from hard-water spots?
Soap and body-product film often looks smeared or waxy and may improve with mild detergent. Mineral deposits more often form pale spots, rings, or rougher residue that remains after a correct detergent wash. Cleaner haze tends to improve with thorough rinsing and a fresh cloth. If a mark does not change after compatible cleaning, consider surface damage rather than automatically using a stronger product.
Can I use a razor blade or abrasive pad on shower glass?
Not unless the door manufacturer explicitly approves the exact tool and method. Shower glass may have a water-repellent coating, texture, existing scratches, or vulnerable seals nearby. Abrasive pads, rough brushes, steel wool, powders, and blades can create permanent damage.
Why does my shower glass still look cloudy after cleaning?
The haze may be incomplete rinsing, a dirty cloth, detergent residue, mineral deposit, etching, fine scratches, or coating wear. Rinse and dry a test section first. If the appearance does not improve with approved methods, stop escalating and ask the manufacturer, installer, coating provider, or a glass professional to assess it.
Should I squeegee the shower door after every use?
It is optional but useful. Removing droplets before they dry generally reduces water spots and the amount of later deposit removal. Follow with a soft cloth at edges and hardware if the manufacturer recommends it, and let both the enclosure and cleaning tool dry.
Can I use the same cleaner on the glass, frame, track, and seals?
Do not assume so. Glass, coatings, metal finishes, vinyl sweeps, rubber gaskets, silicone sealant, acrylic bases, grout, and natural stone can have different restrictions. Treat each material according to its product or manufacturer instructions and control runoff between them.
Sources
- Delta Shower Doors – Shower Door Care and Cleaning Guide
- MAAX Bathware – Bathroom Cleaning and Maintenance Tips
- Health Canada – Use Household Chemicals Safely
- Natural Stone Institute – Learn About Cleaning Products for Natural Stone
- Kohler Showers – How to Clean Your Walk-In Shower With Ease